Hiển thị các bài đăng có nhãn dessert. Hiển thị tất cả bài đăng

Thứ Bảy, 5 tháng 9, 2015

Fresh Peach Pie


My neighbor made this for us when I had the baby and Mom, Dad, and Julie were in town. She brought us dinner that night too and it was so filling that we didn't have enough room for this pie until later that night. I was nursing Caroline at like 10:30pm that night and Mom came in my room and said, "you have got to come try this pie. It's the best pie I've ever eaten." I was soooo tired and just wanted to hit the sack, but I'm so glad that I went and tried it. I could hear the "mmmm's" coming from the kitchen as soon as I walked out of my room. It was so funny. Everyone was dying over this pie. And, it WAS seriously the best pie I've ever eaten. So, get out there and make it before peach season ends!

Fresh Peach Pie
from Kathi Kimble

For crust:
Crush 7 graham crackers in a bag, not in blender (this is key for bigger pieces of graham cracker).
Add 3T. Powdered sugar, then put in pie pan and stir in 6T. melted butter.  Form a crust.

For filling:
Slice and peel about 5 peaches into crust.
Mix 1/4 C lemon juice with 1 can sweetened condensed milk and pour over peaches.
Cover with Extra Creamy Cool Whip (I would prefer fresh whipping cream).
Can be served immediately or refrigerate.
 

Caramel Brownies


My neighbor made these brownies for us when we moved in and Christian said they were the best brownies he'd ever had. So, naturally, I requested the recipe. I made them for a baby blessing last week and they were the first thing gone. They are so scrumptious.


Caramel Brownies
from Kathi Kimble

Melt together in microwave:
14 oz. caramels (2 Cups)
1/2 C. evaporated milk

Mix:
1 German Chocolate cake mix
3/4 C. butter
1/2 C. evap. milk
3/4 C chopped pecans - optional (of course I left these out:))


-Spread HALF of cake mixture in 9x13 greased pan.  Bake at 350 for 5 minutes.

-Remove from oven and sprinkle 6 oz. milk choc. chips over top evenly.

-Pour caramel mixture over.

-Drop the remaining cake mix in clumps on top and mix lightly with caramel.

-Bake at 350 for 20 minutes. Refrigerate. 

Thứ Hai, 15 tháng 12, 2014

French Chocolate Molten Cake


A french girl in Jeremiah's section at HBS came over a few weeks ago and made these cakes for us. If you are a chocolate lover then you will LOVE these. So so goodand perfect with some vanilla ice cream. I've never been a huge fan of molten chocolate cause I feel like it had weird ingredients but this is simple and rich. But mostly I'm posting it to keep a record of it.

Ingredients (for 5/6 ramekins):
200g (7 oz) of dark chocolate (I use 70% in general of Lindt if available) 
120g (1/2 c) of butter
90g (~1/2 c) of sugar
5 eggs
2 tablespoons of flour

Recipe:
1.       Preheat the oven (400F)
2.       Brake the chocolate in pieces and put 5/6 pieces aside (one per ramekin)
3.       Slowly melt the chocolate with the butter (putting metal bowel in pot of hot water and heating up on stove)
4.       Mix the eggs with the sugar and mix it until the batter becomes a little clearer and foaming. Then add the flour. Mix again.
5.       Add the melted chocolate and mix well.
6.       Fill each ramekin with the batter. Add one piece of chocolate per ramekin, and push it down slightly so that it will ‘disappear’.
7.       Bake for 9 minutes exactly. The test if it is done is if the middle doesn't jiggle.

Thứ Năm, 13 tháng 11, 2014

Swig Sugar Cookie


Need I say more??? To die for! I've had the real thing and this taste exactly the same if my taste buds are remembering correctly! Found this on blog posted at bottom of pic. 
WARNING: Do not make unless you have someone to share with! You will eat them all! Trust me! and these make a lot!!! 


Ingredients:
1 C Butter (room temperature)
3/4 C Vegetable Oil
1 1/4 C Sugar
3/4 C Powdered Sugar
2 T Water
2 Eggs
1/2 t Baking Soda
1/2 t Cream of Tarter
1 t Salt
5 1/2 C Flour

Cream together Butter, Vegetable Oil, Sugars, Water, and Eggs.

Combine dry ingredients and slowly add to butter mixture.

Mix until everything is combined.  Your dough should be a little crumbly and not sticky at all.

Roll a golf ball sized ball of dough and place it on your cookie sheet

Now its time to give these babies their signature rough edge.  Put 1/4 c of sugar and a pinch of salt in a dish (this is in addition to the sugar and salt listed above.)  Stick the bottom of a glass in it.  This is going to be your cookie press.

Firmly press it into the center of your dough ball.  You want your dough to spill out over the sides of the glass.  If there is a lip its even better.

Bake at 350 for 8 minutes.  They should just barely be browning on the bottom.    Move cookies to a cooling rack.  Once they are cool put them in the fridge.

Sour Cream Frosting
1/2 cup room temperature butter
3/4 C Sour Cream
Approx 1 2lb Package of Powdered Sugar (I never use the whole thing but love having extra on hand just incase I add to much milk!)
1 t salt
1/4 C Milk
Red Food Coloring

Start by creaming together butter and sour cream and salt.  Slowly add powdered sugar.  When it gets so thick its not frosting like add a splash of milk.  Alternate this process until your frosting is the desired consistency.  Add 1 drop of red food coloring and whip on high for 1 minute.

Keep cookies in a sealed container until they are ready to serve.  The magic of a Swig Sugar Cookie is that the cookies are cold and the frosting is room temperature.  Frost right before serving (if you make them in advance and need to refrigerate the frosting make sure you give it time to warm up before serving)

Thứ Hai, 15 tháng 9, 2014

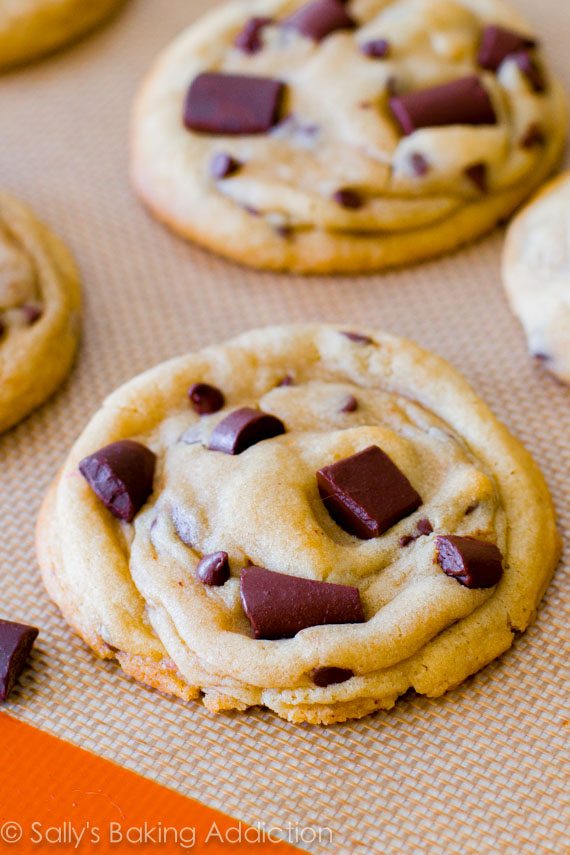
Chewy Chocolate Chunk Cookies

I know there are a million chocolate chip cookie recipes out there BUT these were amazing!  I don't know if the secret is the cornstarch or what, but they are so so yummy!

Chewy Chocolate Chunk Cookies

Recipe from sallysbakingaddiction.com

Ingredients:

  • 2 and 1/4 cups (280 grams) all-purpose flour, measured correctly
  • 1 teaspoon baking soda
  • 1 and 1/2 teaspoons cornstarch
  • 1/2 teaspoon salt
  • 3/4 cup (1.5 sticks or 170 grams) unsalted butter, melted
  • 3/4 cup (150 grams) light brown sugar, loosely packed
  • 1/2 cup (100 grams) granulated sugar
  • 1 large egg + 1 egg yolk*
  • 2 teaspoons vanilla extract
  • 1 cup (180 grams) chocolate chips or chocolate chunks

Directions:

Click here for step-by-step photos and careful explanations of all of these steps.
Toss together the flour, baking soda, cornstarch and salt in a large bowl. Set aside.
In a medium size bowl, whisk the melted butter, brown sugar, and white sugar together until no brown sugar lumps remain. Whisk in the egg, then the egg yolk. Finally, whisk in the vanilla. Pour the wet ingredients into the dry ingredients and mix together with a large spoon or rubber spatula. The dough will be very soft, yet thick. Fold in the chocolate chips. They may not stick to the dough because of the melted butter, but do your best to have them evenly dispersed among the dough. Cover the dough and chill for 2 hours, or up to 3 days. Chilling is mandatory.
Take the dough out of the refrigerator and allow to slightly soften at room temperature for 10 minutes.
Preheat the oven to 325F degrees. Line two large baking sheets with parchment paper or silicone baking mats. Set aside.
Roll the dough into balls, about 3 Tablespoons of dough each. The dough will be crumbly, but the warmth of your hands will allow the balls to stay intact. Roll the cookie dough balls to be taller rather than wide, to ensure the cookies will bake up to be thick. See this post for more clarity and a photo. Put 8 balls of dough onto each cookie sheet. Press a few more chocolate chips/chunks on top of the dough balls for looks, if desired. Bake the cookies for 11-12 minutes. The cookies will look very soft and underbaked. They will continue to bake on the cookie sheet. Allow to cool on the cookie sheet for 10 minutes before moving to a wire rack to cool completely.
Cookies stay soft and fresh for 7 whole days at room temperature. Cookies may be frozen up to 3 months. Rolled cookie dough may be frozen up to three months and baked in their frozen state for 12 minutes.
*Room temperature egg + egg yolk are preferred for even disbursement.  Typically, if a recipe calls for room temperature or melted butter, it's a good idea to use room temperature eggs as well.  To bring eggs to room temperature quickly, simply place the whole eggs into a glass of warm water for 5 minutes.  

Thứ Bảy, 29 tháng 3, 2014

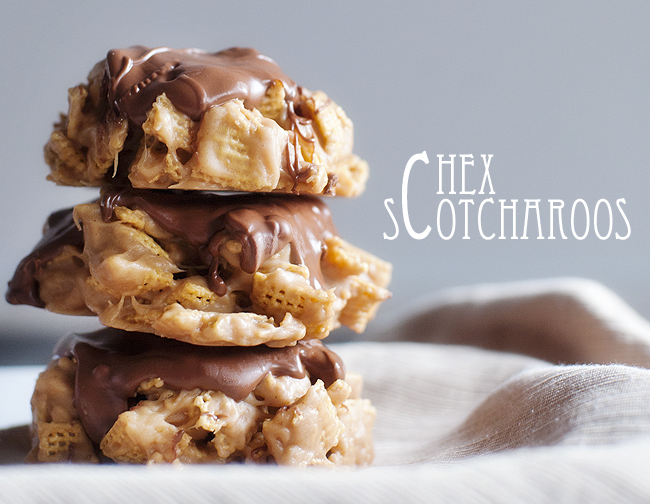
Chex Scotcharoos

These were amazing!  I enjoyed making them into the free standing cookie style instead of the typical cookie bar style.  They were so soft and delicious!  My frosting got a bit clumpy so i would probably leave the peanut butter out next time to see if it helped.  I added some butter to smooth it out.  I also doubled the chex/corn syrup/sugar mixture and kept the frosting portions the same.  It was plenty of frosting.

Chex Schotcharoos
Recipe from prettyplainjanes.com
  • 6 cups Chex cereal
  • 1 cup light corn syrup
  • 1 cup sugar
  • 1 1/2 cups peanut butter
  • 2 cups semi sweet chocolate chips
  • 2 cups butterscotch chips
  • 1/2 cup peanut butter
  • 1 teaspoon vanilla
  1. Butter a large bowl, and measure out 6 cups of Chex cereal. Set aside. Butter a 9x13 dish, OR line a baking sheet with wax paper if you would like freeform scotcharoo's like the ones I made that are pictured.
  1. In a small saucepan, combine the corn syrup and sugar over medium heat. Once boiling, immediately remove from heat and stir in 1 1/2 cups of peanut butter. Pour over cereal and fold together. Pour cereal into the 9x13 dish, or use a large cookie scoop to drop cereal onto wax paper, and use your hands to press together and form them.
  1. Using a microwave safe dish or a double boiler, melt together chocolate chips, butterscotch chips, 1/2 cup of peanut butter and vanilla. If microwaving, heat in 10 second intervals, stirring in between to prevent the chocolate from burning.
  1. Once smooth, pour over cereal, or scoop onto the piles you have created.
  1. Allow to cool completely at room temperature.

Thứ Hai, 24 tháng 3, 2014

Banana Nutella Quesadilla


Banana Nutella Quesadillas
We had these for our FHE treat tonight and there were delicious!  Plus, the kids could help with the dessert.  I had two kids slice bananas while another spread the nutella.  To make it a little more calorie friendly I just used cooking spray instead of butter, even to put the cinnamon on it.  Yum, yum!

Banana Nutella Quesadillas
Recipe from insidebrucrewlife.com
Ingredients
4 flour tortillas
1 Tablespoon butter
2 Tablespoons cinnamon sugar
1/4 cup Nutella
2 ripe bananas
Instructions
  1. Spread butter on one side of each of the tortillas and sprinkle with cinnamon sugar. Place the butter side down on a warm skillet and heat until golden brown.
  2. Spread the non butter side with Nutella. Top with banana slices. Place another warm tortilla shell, cinnamon side up, on top. Makes 2 full quesadillas. Cut each quesadilla into 8 wedges. Serve with Cool Whip if desired. Serves 4.

Chủ Nhật, 9 tháng 3, 2014

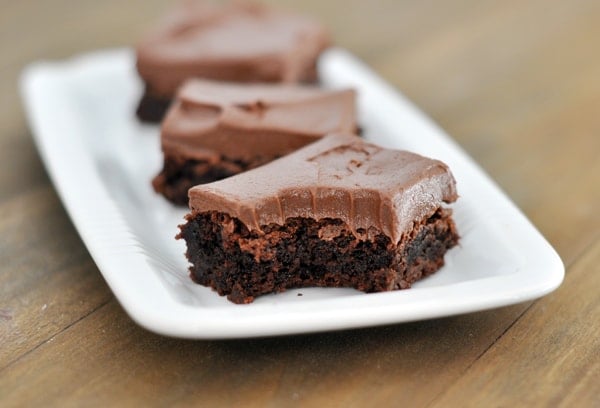
Chocolate Frosted Brownies


I made these a few weeks ago when I was craving a BYU brownie. These were fabulous via mels kitchen cafe. The only thing I would change is a little less butter in the frosting and more powdered sugar to make it a bit more fluffy. Also Maybe a tad less salt in the frosting and brownie itself. Regardless, these were heaven and the company was in love as well!

Chocolate Frosted Brownies
YIELD: MAKES 12-16 BROWNIES
Note: This recipe can be doubled for a 9X13-inch pan. Bake for about 5 minutes less than the recipe states below and increase as needed while you check for doneness (cause there's nothing worse than an overcooked brownie).
INGREDIENTS
    For the Brownies:
  • 1/2 cup butter
  • 3 ounces unsweetened chocolate chopped (about 1/2 cup)- I just used semisweet chocolate chips
  • 1/2 cup granulated sugar
  • 1/2 cup light brown sugar
  • 2 large eggs
  • 1 teaspoon vanilla extract
  • 1/2 cup semisweet chocolate chips
  • 3/4 cup all-purpose flour
  • 1 teaspoon baking powder
  • 1/4 teaspoon salt
  • For the Frosting:
  • 6 tablespoons butter, at room temperature
  • 1/4 cup unsweetened cocoa powder
  • 1/8 teaspoon salt
  • 1 1/4 cups powdered sugar
  • 1/2 teaspoon vanilla extract
  • 3-5 tablespoon milk or cream
DIRECTIONS
  1. Preheat the oven to 350 degrees F. Line an 8-inch-square baking dish with foil, letting the excess hang over the edges (this helps to make "handles" for lifting out the brownies after they have cooled). Lightly grease the foil; set aside.
  2. In a medium-size microwave-safe bowl, combine the chocolate and butter for the brownies. Microwave for 1-minute increments at 50% power, stirring in between, until the chocolate and butter are melted and smooth. Whisk in the granulated and brown sugars. Whisk in the eggs and the vanilla extract. Add the flour, baking powder and salt. Fold the dry ingredients into the chocolate mixture with a rubber spatula until combined. Stir in the chocolate chips.
  3. Pour the batter into the prepared pan and bake for 25-30 minutes, until a thin knife or toothpick inserted in the center comes out clean or with a few moist crumbs. Remove the brownies from the oven and allow them to cool completely.
  4. For the frosting, using an electric mixer (handheld or stand mixer), cream together the butter, cocoa powder, and salt on medium speed for about 2-3 minutes. Scrape down the sides of the bowl and add the powdered sugar. Mix on low speed to incorporate the sugar. Add the vanilla and milk, starting with a couple tablespoons and adding more as needed to adjust the consistency. Increase the mixer speed to medium-high, beating until smooth and fluffy.
  5. Spread the frosting onto the cooled brownies. Store the brownies in an airtight container, or tightly wrapped, at room temperature or in the refrigerator (I highly, highly, highly prefer my brownies chilled in case you care) for 3-5 days.

Thứ Bảy, 8 tháng 3, 2014

Rocky Road Brownies

This makes a great gift that was recently given to me by a friend as a mix-in-a-jar.  And they were hands-down the best brownies I've ever eaten.  I mean, c'mon, they're made with buttermilk.  How can you go wrong?  Move over, Ghiradelli Brownie mix, I found my new favorite.


Rocky Road Brownies
recipe from Deer Lake Cookie Recipes 

If giving as a gift, add these dry ingredients to a tall Mason jar in this order (bottom to top):

1/2 cups all-purpose flour
1 cup semisweet chocolate chips
1 cup granulated sugar
1 cup miniature marshmallows
1/2 cup unsweetened dark cocoa powder
3/4 cup coarsely chopped walnuts
Recipe Note: put the marshmallows in a resealable plastic food storage bag; seal bag. Use marshmallows as the final layer in jar.

Wet Ingredients (include a note with your jar to add these ingredients):

1/2 cup butter
1 egg (lightly whipped with a fork in a small bowl)
1/4 cup buttermilk
1 tsp. vanilla

Preheat your oven to 355 degrees. Lightly grease 8X8-inch baking pan.  Remove marshmallows from plastic food storage bag in jar; set aside.

In a large bowl, add in Rocky Road dry mix from jar. Next, add in egg, buttermilk, melted butter and vanilla; stir until blended.
Spread batter evenly into your prepared pan. Bake 25 to 32 minutes or till it sets up. While hot; sprinkle miniature marshmallows over brownies. Now bake for an additional 3 to 5 minutes or until marshmallows are puffed and slightly melted. (Watch those rocky road brownies close, nobody likes burnt brownies.) Cool completely in pan on wire rack. Cut into squares.

Thứ Bảy, 1 tháng 2, 2014

S'mores in a Pan

We had these for a quick FHE treat the other night.  They were delicious and something that most of us would just have the ingredients sitting around in our pantry for.  Perfect last minute treat.

S’mores {in a pan}
Recipe from brownsugartoast.com
Ingredients
  • 1 cup chocolate chips
  • 1 cup mini marshmallows (or large marshmallows cut in half)
  • graham crackers
Instructions
  1. Preheat oven to 450 degrees.
  2. Evenly spread chocolate chips in a greased, oven-safe pan.
  3. Pour marshmallows on top of chocolate chips.
  4. Bake for 8 minutes, or until marshmallows are lightly toasted.
  5. Serve immediately with graham crackers.

Thứ Hai, 13 tháng 1, 2014

Cheesecake Rice Pudding

Cheesecake Rice Pudding


We had some friends over this weekend and they're gluten intolerant, so I wanted to make a yummy dessert that they could eat. I love rice pudding, so I was excited when I came across it, knowing that it was also gluten free! It was sooooo yummy! Everyone loved it!

Cheesecake Rice Pudding
from Mel's Kitchen Cafe 

    Pudding:
  • 4 cups half-and-half
  • 2 cups cooked medium grain rice
  • 1 cup granulated sugar
  • 1/4 teaspoon salt
  • 1 egg, beaten and brought to room temperature
  • 1 teaspoon pure vanilla extract
  • Cream Cheese Variation:
  • 6 ounces cream cheese, cut into cubes and softened to room temperature
  • 2 tablesoons powdered sugar 

  1. Pour 3 1/2 cups of the half-and-half, cooked rice, sugar, and salt into a large 3 to 4 quart pot. Stir constantly over medium heat with a wooden spoon or flat silicone spatula until the mixture thickens, 25-35 minutes. Remove from the heat.
  2. Place the beaten egg in a medium bowl. Slowly add a spoonful of the hot pudding to the egg, whisking vigorously and constantly. Continue to temper the egg with 3-4 more spoonfuls of the hot pudding, whisking constantly. Add the tempered pudding and egg mixture into the pot of hot rice pudding, stirring quickly to incorporate. Return the pot to medium heat and stir constantly until the mixture boils.
  3. Remove from the heat and stir in the last 1/2 cup of half-and-half and the vanilla extract.
  4. Stir the softened cubes of cream cheese into the hot pudding. Add the powdered sugar and stir well until the cream cheese is fully melted and incorporated. Transfer the pudding to a large bowl. Press a piece of plastic wrap directly on the surface of the pudding to avoid a skin forming and refrigerate until ready to serve. The pudding can be served warm, room temperature or cold and will keep well covered in the refrigerator for 3-4 days.

Thứ Sáu, 6 tháng 12, 2013

Chocolate Peppermint Cupcakes


I learned how to make these by a retired wedding cupcake maker a few years ago and have made them every Christmas since. They are easy, amazing and a must try.

Cupcakes:
1 Duncan Hines Devils Food cake mix
1 Large package of instant chocolate pudding
1 Package of Trader Joe's Peppermint Jo jo's (or peppermint oreos)
  • Make the cake mix according to directions (oil, water, egg etc) and add the pudding powder at the end before baking.
  • Line muffin tin with cupcake papers
  • Place a spoonful of batter in the bottom of paper placing a cookie on top and covering with another spoonful of batter (make sure the cup isn't too full of batter adjust accordingly)
  • Bake according to package directions
Frosting:
2 Cubes of unsalted butter at room temp (those details are a must for yummy frosting- don't skip)
1/2 tsp of salt
3 and 3/4 Cups powdered sugar
1 tsp vanilla
2 tablespoons milk
  • Combine all ingredients except for the milk thoroughly and add milk at the end.
  • Wait till cupcakes are completely cooled to frost
Frosting tip:
you can either spread on think with a knife or place a large frosting tip in the corner of sandwich bag. Cut off small tip of sandwich bag and push frosting tip out so exposed. fill bag with frosting, twist the top shut and frost cupcakes.


Thứ Hai, 18 tháng 11, 2013

Browned Butter Sea Salt Chocolate Chip Cookies

I know what you're thinking..."we really need another chocolate chip cookie recipe on Peachtree Cooking".  Right?  This one is different from your regular cookie because of the browned butter- it gives the cookie a rich, caramel flavor that is beyond delicious.  David White's cute wife, Bonnie, brought these over when we had them to dinner, and the plate was cleaned before any of us had enough.  Seriously amazing.
actual picture
Browned Butter Sea Salt Chocolate Chip Cookies
Bonnie White

2.5 c flour
1.5 tsp baking soda
1.5 tsp sea salt
2 sticks unsalted butter
1.5 c packed brown sugar
1 egg and 1 egg yolk
2 tsp vanilla
1 Tbs. Greek yogurt
1/2 c semi sweet choco chips
1/2 c milk chocolate chips

Heat oven to 350.  Brown your butter in a skillet on your stovetop until it turns a golden brown, but before it burns (don't leave it).  Pour into mixer and blend with sugar until well blended.  Add remaining wet ingredients.  Mix in dry ingredients until combined.  Stir in chocolate chips.  Chill in freezer for 30 minutes.  Scoop onto baking sheet and sprinkle with sea salt (optional).  Bake 8-10 minutes.

Chủ Nhật, 17 tháng 11, 2013

Amy's Chocolate Chip Cookies


Rachel gave me this recipe years and years ago and I cannot believe we've never posted it here before! I get requests for this recipe ALL THE TIME when I make them. They are sooo yummy. They are definitely my go-to chocolate chip cookies recipe and that's saying a lot since I make cookies at least weekly.

Amy's Chocolate Chip Cookies
from Amy Shumway

3 sticks butter
1 1/4 cups sugar
1 1/4 c. brown sugar
1 Tbs. vanilla
2 eggs
4 c. flour
2 tsp. baking soda
1 tsp. salt
1-2 pkg. chocolate chips

Preheat oven to 350. Place slightly softened butter in mixer and add sugars. Mix until butter and sugar is totally incorporated and the consistency is light and fluffy, scraping down the sides of the bowl 1 or 2 times. Add eggs and vanilla and mix well, scraping down sides of bowl. Consistency should be light and fluffy. Add flour, baking soda, and salt in the mixing bowl and mix just until incorporated, scraping down the sides of the bowl. Don’t overmix! Add chocolate chips and mix just until distributed. Don’t overmix! Using a cookie scoop, place cookies on sheet. Bake 9-11 minutes or until the bottom of the cookie is golden brown around the edge.
 

Thứ Hai, 21 tháng 10, 2013

The Perfect Chocolate Chip Cookie

Our family makes chocolate chip cookies almost every Sunday.  I love to try new recipes (I think I've tried every one on this blog), while my husband sticks with good ol' Nestle Toll House.  His argument..."Why try to improve on perfection?"  Well, yesterday, improve we did.  Only, in my humble opinion, this improvement is about 100 times better than Nestle Toll House.  It really is the perfect chocolate chip cookie.  I have to give credit where credit is due, though.  My 13-year-old daughter made these cookies by herself while I was gone, and I only helped her shape them on the pan when I returned.  I assume she followed the recipe exactly as it is (with a few extra chocolate chips, a mix of milk chocolate and semi-sweet).  I did give her one tip before I left the house:  always use a wooden spoon rather than a beater to stir the dry ingredients into the wet ingredients.

picture courtesy of Annie's Eats
The Perfect Chocolate Chip Cookie
adapted from a friend's recipe

1 cup butter, at room temperature
1 1/2 cups brown sugar
1/2 cup white sugar
2 large eggs, at room temperature
1 Tbs. pure vanilla extract
2 3/4 cup all purpose flour
1 tsp. baking soda
1/2 tsp. salt
2 cups semi-sweet chocolate chips

Preheat oven to 350 degrees.  Line two baking sheets with parchment paper or silicone baking mats (or you can use a plain old jelly roll pan)

Beat butter with electric mixer until creamy.  Add the brown sugar and beat for 5 minutes on high speed until light and fluffy.  Add the eggs, one at a time, beating for another minute after each addition. Add the vanilla and mix well.

Whisk together the dry ingredients.  Add the dry ingredients to the creamed mixture in two or three additions, mixing on low speed just until the flour is incorporated.  Stir in the chocolate chips using a silicone spatula or the mixer on low speed.

Using a small ice cream scoop or tablespoon, drop balls of dough onto the prepared baking sheets, leaving a few inches of room between them.  Bake for 10-12 minutes.  Let cookies cool on baking sheet for about 10 minutes before transferring them to a cooling rack.

*my daughter used a rather large ice cream scoop and made bigger cookies, pressing the dough down so they were evenly spread.

Thứ Tư, 18 tháng 9, 2013

Fresh Peach Crisp

Perfect Peach Crisp from Our Best Bites
 Pic courtesy of Our Best Bite


I'm seeing a lot of sweatshirts on Instagram which means Fall is here in some parts of the country, but not here in Texas! I'll take another month of heat for a nice, temperate Winter, though. I was feeling Fall-ish the other day, though, and decided to make a fresh peach crisp because we invited some friends over for dessert. It was seriously SOOOO delicious. Everyone loved and it and it was gobbled right up in a hurry. I served mine up with a scoop of Blue Bell Vanilla Bean ice cream. There is a great tutorial on how to get the skins off of peaches on Our Best Bites. If you're going to make this, definitely take a look at it to save time and energy. Mmmmm!

Fresh Peach Crisp
Topping by Our Best Bites, Filling by ATK

Filling Ingredients
3 1/2 lbs ripe but firm peaches (6-8), peeled, pitted, and sliced into 3/4″ wedges.
1/3 cup granulated sugar
1 1/4 teaspoons cornstarch
1 tablespoon fresh lemon juice
Pinch salt
pinch of cinnamon
pinch of ground nutmeg
Crumb Topping
1 1/2 cups old fashioned oats
1/2 cup brown sugar
1/4 cup flour
6 tablespoons cold butter
1/2 teaspoon cinnamon
1/4 teaspoon nutmeg
Preheat oven to 350.
Instructions
For peach filling, gently combine peaches and sugar in a large bowl and let stand for 30 minutes, tossing occasionally. Drain peaches in a colander set over a large bowl, reserving the peach juices. Whisk 1/4 cup of the drained peach juice, cornstarch, lemon juice, salt, cinnamon, and nutmeg together in small bowl.  (You can discard the rest of the excess peach juice or toss it in a smoothie!) Toss juice mixture with peaches and transfer to an 8 or 9 inch square pan that’s been sprayed with cooking spray.  Any size pan that’s close to that is fine, it doesn’t need to be exact.  As long as it all fits, it’s good :)
For topping, combine oats, brown sugar, flour, nutmeg, and cinnamon and either grate the cold butter with a large-hole cheese grater, or cut it into small cubes and use your fingers to crumble the mixture together.  Sprinkle topping evenly over pan.
Bake for about 30 minutes.  The topping should look golden brown and crisp, and I always watch for little bubbles of peach liquid to start popping though the outside corners.  Let cool to luke warm before serving.  Spoon over ice cream.

Thứ Sáu, 12 tháng 4, 2013

"Healthy" Chocolate Blender Ice Cream

I was at Costco today and the Vitamix guy was there doing demonstrations.  I hung around for a while, collecting samples of delicious green smoothies and THEN he made chocolate ice cream.  I saw the ingredients and was totally skeptical about whether or not it would be edible by me, much less my kids.  I took one sip and was totally sold- I would've eaten all of it, but Lauren took it from me and wouldn't give it back.  She licked the sample cup clean!  It tasted amazing- I promise you cannot taste one of the "healthy" ingredients.  Doug, the Vitamix presenter, sent me a link to his recipe (click here) and I made it for dessert tonight.  It tasted just as amazing, and all of my kids were gobbling it up and throwing praises at their "best mom in the world".  :)  You can add peanut butter, banana, chocolate chips, mint flavor, whatever you want to make it your own.
courtesy google images
"Healthy" Chocolate Blender Ice Cream
Doug, the Blender Chef

1/2 cup milk (or half & half, heavy cream for richer taste)
3 1/2 Tbs. cocoa powder
7 Tbs. hot cocoa mix (you can find a healthier one if you try- I used a Trader Joes mix)
4-6 baby carrots
small slice cabbage
small handful spinach (I didn't have cabbage so I doubled this)
1/2 of an avocado
sweetener to taste (5 Hadley dates, agave nectar, honey, etc.)
2 cups ice

Blend these ingredients on low beginning on 1 then increasing to 10, run for 10 seconds then stop.  Use tamper stick to push ice down.  Results are best when using a Vitamix.

*Doug (and his co-presenter, Keith) has a lot of great recipes for soups and smoothies that can also be found by clicking on this link.

Thứ Năm, 21 tháng 3, 2013

Banana Bars with Whipped Cream Cheese Frosting


I made this cake because I needed to use overripe bananas and this was something new to try.  It was amazing!  It makes a ton so I delivered some to neighbors and friends, and every single one of those people came to me later and demanded the recipe.  Its such a light, fluffy, delicious "cake".  It was easy to make and the flavors are perfect together.
  • Banana Bars with Whipped Cream Cheese Frosting
  • Mel's Kitchen Cafe

  • 1/2 cup butter, softened
  • 1 ½ cups white sugar
  • 2 eggs
  • 1 cup sour cream
  • 1 tsp vanilla
  • 2 cups all-purpose flour
  • 1 tsp baking soda
  • ¼ tsp salt
  • 1 cup mashed ripe bananas (I used three ripe bananas)
  • Whipped Cream Cheese Frosting:
  • 1 (8 oz) package cream cheese, softened to room temperature
  • 1 cup white sugar (you can use either granulated sugar or confectioners’ sugar – the confectioners’ sugar tends to dissolve better and not be as grainy but either one works fine)
  • 1/8 tsp salt
  • 1 tsp vanilla
  • 1 ½ cups heavy whipping cream
Directions
  1. For the banana bars, preheat the oven to 350 degrees. Grease a 10 x 15 inch jellyroll pan or one 9X13 pan and an additional 8X8 pan. In a large bowl, cream together the butter and sugar until smooth. Beat in the eggs, one at a time, then stir in the sour cream and vanilla. Combine the flour, baking soda and salt in a medium bowl; stir into the batter. Finally, mix in the mashed banana. Spread evenly into the prepared pan(s). Bake for 20 to 25 minutes, until a toothpick inserted into the center comes out clean. Allow bars to cool completely before frosting.
  2. For the frosting, in a large bowl combine cream cheese, sugar, salt and vanilla. Beat until light and fluffy. Set aside. In another medium bowl, beat whipped cream until stiff peaks form (it helps to use a chilled bowl and chilled beaters). Fold whipped cream into cream cheese mixture. Frost to your heart’s delight!

Chủ Nhật, 6 tháng 1, 2013

Vanilla Cupcakes with American Buttercream Frosting


A couple of months ago, my husband came up with this idea that sharing the gospel is a "piece of cake".  At the time we were both serving as ward missionaries, so the idea evolved to become a plan to make cupcakes for all the adult members of our ward and give them out with only a promise by the recipient that before the cupcake was eaten, the gospel would be shared in some sort of "easy" way.  Knowing that I am a cupcake connoisseur (or you could call me a cupcake snob, or just plain obsessed with cupcakes), I got the assignment to bake these 150+ cupcakes.  Really, I was actually excited for an excuse to try different cupcake recipes and frostings.  If I could come up with something even remotely resembling a Sprinkles cupcake, then I would be thrilled!  Fortunately, it didn't take long for me to find these recipes.  The cake is somewhat dense and the frosting is perfect (that is, of course, if you must do buttercream and not cream cheese frosting, which I will always prefer).  Oh my, I just wish I had another excuse to bake these again!

Vanilla Cupcakes
adapted from Pioneer Woman


1 cup Vegetable Shortening

1-3/4 cup Sugar

2-1/2 cups Cake Flour

1-1/4 teaspoon Salt

2 whole Large Eggs

1 cup Buttermilk

2-1/2 teaspoons Vanilla Extract

1 teaspoon Baking Soda

1-1/2 teaspoon Vinegar


Preheat oven to 350 degrees. Line 18 muffin cups with cupcake liner papers.
Cream shortening and sugar until fluffy. Set aside.
Sift together flour and salt. Set aside.
Mix eggs, buttermilk, vanilla, baking soda, and vinegar in a separate bowl.
Alternate adding flour mixture and buttermilk mixture to the shortening mixture, mixing after each addition. Mix until totally combined.
Pour batter into cupcake liners. Bake for 17 to 20 minutes, or until just done.  Remove from oven, then remove cupcakes from pan and let cool completely. *I made the mistake of overcooking them almost every time because I waited until they looked brown and done before removing them from the oven.  They will still be almost white and look under-done in the middle of the cupcake.  They will finish cooking on the counter.  Trust me! 

American Buttercream Frosting
adapted from GloriousTreats.com
1 cup (2 sticks) butter (salted, or unsalted)
1/4 teaspoon salt (if using unsalted butter)
4 cups powdered sugar
1 teaspoon vanilla extract (best quality available)
2-3 tablespoons heavy cream, half and half or milk

1/2 cup good quality unsweetened cocoa (if you want chocolate instead of vanilla)
* In the bowl of an electric mixer, fitted with the whisk attachment, beat butter (on medium speed) until completely smooth (30 seconds to a minute). (If you are adding cream cheese, add it now, then beat until smooth)
* Add salt (if needed).
* One cup at time, add 2 cups of powdered sugar, beating after each addition.
* Add vanilla, or other flavorings and beat to combine.
* Add about 1 tablespoon of cream, and continue beating.
* Add the remaining 2 cups powdered sugar, one at a time.
* Add an additional 1-2 tablespoons cream until desired consistency is reached.  If you want to pipe the frosting on cupcakes, the frosting should be nice and thick.  Continue to beat another minute or so.  The frosting should now be smooth and fluffy.
Troubleshooting-
* If your frosting is not smooth, it is likely because the butter was not fully smooth before adding the other ingredients.
* If your frosting will not hold up when piped on cupcakes, your frosting has too much liquid or is too warm.  Put entire bowl of frosting in the fridge for 15-20 minutes and it will stiffen up.  If it is still too thin, then add 1/4 to 1/2 cup powdered sugar, beat well.